A publish-ready workflow for AI-generated videos: subtitles, audio, and final polish
A practical workflow to turn AI-generated footage into publish-ready clips: add verified subtitles, voiceovers, music, and exports using GoCrazyAI Media Mixer.
AI video editing tips matter the moment your AI render finishes — raw outputs are rarely publish-ready. If you want clips that perform on TikTok, Reels, Shorts or in paid ads, you need accurate subtitles, a clean voiceover, balanced music, and brand overlays that don’t break edits. That’s where GoCrazyAI Media Mixer becomes the post-production hub: it burns subtitles, adds voiceovers and music, layers overlays, and exports a final file in one click.
This guide gives a practical, publish-ready workflow for creators and small teams who already generate footage with tools like Veo or Sora. Expect concrete checks, a short hands-on walkthrough inside GoCrazyAI Media Mixer, and time-saving tips so you can move from master file to platform-specific clip in minutes.
Why publish-ready AI clips need more than a raw render: engagement, accessibility, and platform rules
AI generators produce impressive footage quickly, but a raw render misses three things viewers and platforms care about: engagement, accessibility, and compliance.
Engagement. Subtitles and tight pacing directly affect completion rates. Kapwing’s subtitle statistics show that viewers are far more likely to finish a video when captions are present, and many people watch with sound off. That means your visuals must pair with readable text and confident audio choices to keep eyes on the screen.
Accessibility and compliance. Professional caption workflows treat captions as a creative element and a legal/accessibility requirement; WCAG guidance for prerecorded media expects accurate captions. Treat captions as part of the design, not an afterthought — that reduces complaints and broadens your audience.
Platform rules and technical expectations. Different platforms prefer different aspect ratios, codecs, and loudness targets. A mock-perfect AI clip can fail on upload if subtitles are supplied only as a sidecar file, or if audio peaks violate platform loudness. The final step in your stack should let you burn subtitles, conform audio, and export multiple aspect ratios without bouncing between tools.
That final step is the role of GoCrazyAI Media Mixer: it centralizes subtitles, voiceovers, music, and overlays so you make engagement, accessibility, and platform rules part of the finish rather than a post-upload scramble.
How to build an efficient AI-generated video workflow (master file → short clips → variants)
An efficient workflow starts with one clean master and branches into short-form variants. Treat the master as the canonical edit: a verified transcript, the highest-resolution render, and a single audio mix. From there, you create platform-specific clips.
Step 1 — Generate the master. Use your preferred AI video generator to render the highest-quality version (for example, create your footage in a tool like GoCrazyAI’s AI video generator). Keep the original aspect ratio and full audio.
Step 2 — Create a verified transcript. Export or auto-generate a transcript from your master; if the generator offers a transcript, use it as a starting point. Modern subtitle accuracy averages 85–95% depending on audio quality, so plan a short human pass for corrections.
Step 3 — Trim to a master short. Decide the primary short you’ll publish first (e.g., a 30–60s TikTok cut). Use text-based trimming where possible—editing by transcript eliminates guesswork and speeds the cut.
Step 4 — Produce variants. From that master short, derive vertical (9:16), square (1:1), and landscape (16:9) versions. Export both burned-in captions (for platforms that ignore sidecars) and sidecar SRT/VTT files for SEO and accessibility. Rendering each variant from the same master preserves timing and branding.
Tools that combine transcript editing with a repurposing/export panel will save the most time. When you consolidate subtitle generation, voiceover insertion, music layering, and overlay placement into one tool, you reduce export churn and alignment issues. That’s the practical advantage of finishing in GoCrazyAI Media Mixer: one place to produce all variants from one master.
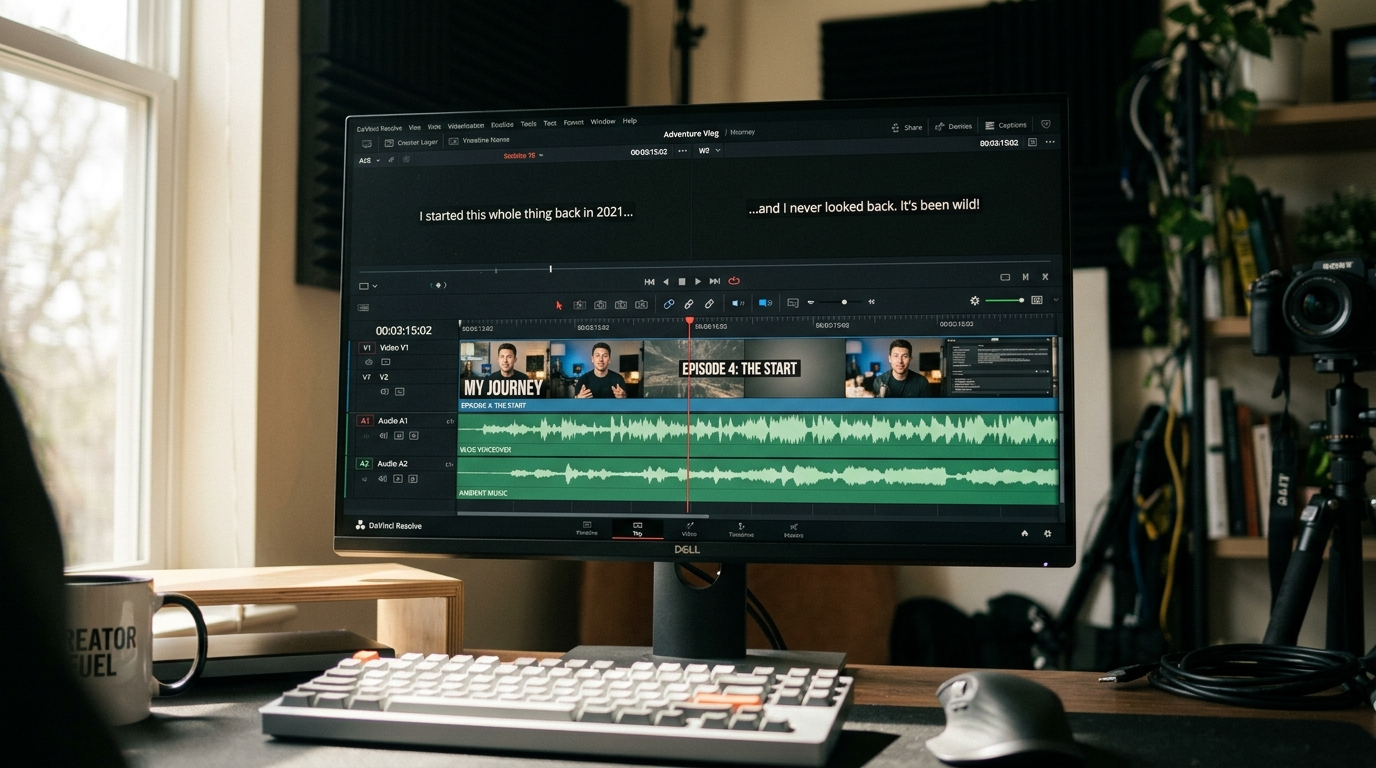
Hands-on: Adding and verifying accurate subtitles and captions for social platforms
Subtitles are non-negotiable for social. They increase completion and accessibility, and platforms have inconsistent caption handling — so you should both burn captions and export SRT/VTT files.
Start with an automatic transcript. Most AI tools (including the finalization stage in GoCrazyAI Media Mixer) will generate a transcript from the master audio. Expect 85–95% accuracy in ideal conditions; noisy audio or heavy accents reduce that number. Always run a human pass of 2–5 minutes per short to fix misheard words, speaker labels, and timing.
Style and readability rules. Keep lines to 32–40 characters when possible, split on natural phrase breaks, and limit each subtitle to two lines. Use sentence-style capitalization and consistent punctuation. Remove filler words where it doesn’t change meaning — doing so usually costs only a minute and improves flow.
Burned-in vs. sidecar. Burned-in subtitles ensure every viewer sees text even when a platform strips sidecars. Sidecar files (SRT/VTT) help search and accessibility on platforms that accept them. Best practice: export both for every variant.
Verify timing and placement. Check subtitle blocks against visual cuts to avoid text that appears between quick cuts or overlaps important visual elements. Use safe-area guides and test in 9:16 and 1:1 canvases — captions that look fine in 16:9 can block key visuals in vertical crops.
Practical with GoCrazyAI Media Mixer. Here’s a short walkthrough:
- Upload your master render into the Media Mixer panel.
- Open the Subtitles tab and click Generate Transcript — the tool auto-creates timecoded captions.
- Run the Quick Review to jump to mis-transcribed lines; edit inline and hit Apply.
- Choose Burned-in Subtitles for TikTok export and also Export SRT for YouTube.
That flow keeps caption creation and verification in the same place you adjust timing and overlays, saving export cycles and reducing mistakes. For further reading on subtitle benefits, see Kapwing’s subtitle statistics: https://www.kapwing.com/resources/subtitle-statistics/.
Hands-on: Layering voiceovers, music, SFX, and brand overlays without breaking edits
Audio and overlays are where polish turns generic footage into a professional clip. The goal is to add elements while preserving timing, lip sync, and visual rhythm.
Voiceovers first. If your AI master needs narration, record or generate the voiceover and align it to the transcript. GoCrazyAI Media Mixer can add voiceover clips directly: import a recorded track, or use the platform’s AI Voices to generate narration. Place the voice clip on a separate track and nudge it to match transcript timecodes.
Music and loudness. Choose background music that complements pacing and doesn’t compete with speech. Use a music stem or mix that leaves -18 to -16 LUFS headroom under dialogue. Apply ducking: automate music gain to drop whenever dialog or voiceover is present. GoCrazyAI’s mixer panel supports layered music with ducking controls so you can balance speech and score without rendering multiple test files.
SFX and micro-animations. Use sparing SFX to emphasize product reveals or cuts. Put SFX on a track above music but below dialog for easier granular control. For brand overlays, use vector-safe text and position overlays within safe margins. Make sure overlays scale properly across 9:16 and 1:1 crops — the Media Mixer preview shows how overlays reflow across aspect ratios.
Walkthrough example in Media Mixer:
- In the Audio tab, import your AI-generated instrumental from the AI music generator or upload an external track.
- Add a voiceover clip on the Narration track (or generate one via AI Voices), then enable Auto-Duck and set threshold -12 dB.
- In Overlays, add your brand text and logo, pick a safe margin preset, and apply Fade In/Out to match cuts.
By keeping voice, music, SFX, and overlays in a single panel you avoid timing drift and get predictable exports. If you generate music on the fly, consider integrating the GoCrazyAI AI music generator to produce stems that fit the cut, then finalize in the Media Mixer.
Quality checklist: What to review before exporting (readability, loudness, export settings)
Before you hit export, run through a focused checklist that catches 90% of post-production issues.
Subtitles
- Accuracy: Confirm transcript corrections (human pass).
- Readability: 32–40 characters per line, max two lines, correct line breaks.
- Placement: No overlap with faces or product details in any crop.
Audio
- Loudness: Speech integrated to platform loudness targets (use -14 LUFS for most streaming platforms or follow your ad platform spec).
- Clipping: No peaks above -1 dBFS after master limiter.
- Ducking: Music reduces during speech; SFX are balanced and not masking voice.
Visuals and overlays
- Safe area: Text and logos inside safe margins for all aspect ratios.
- Motion: Overlays don’t jitter across cuts; keyframes are applied smoothly.
- Color and contrast: Text passes contrast checks for legibility.
Export files
- Burned-in captions: Generate at least one burned-in export for social platforms that ignore sidecars.
- Sidecars: Export SRT and VTT files for YouTube and SEO.
- Aspect variants: Export 9:16, 1:1, and 16:9 masters.
- Codec and bitrate: Use H.264/HEVC as required by platform and select bitrate to avoid compression artifacts.
A rapid preflight should take 3–7 minutes per short. Removing filler words and silences, normalizing loudness, and adjusting subtitle readability often cost only a few minutes but materially reduce drop-off and rework. Because GoCrazyAI Media Mixer centralizes these checks, you can run them in one session and export final assets without shuttling files between apps.
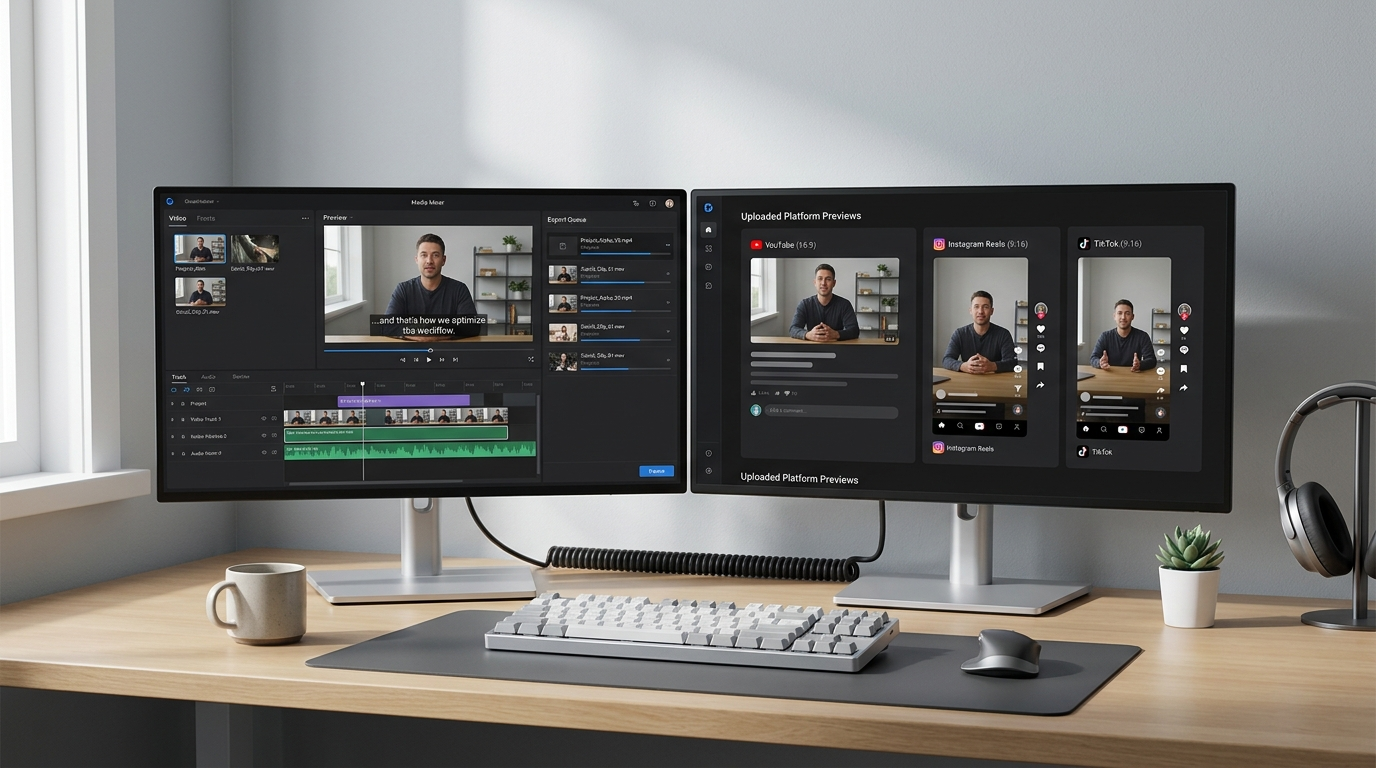
Repurposing one AI master into platform-specific outputs in under 30 minutes
Repurposing speed depends on prep: a verified transcript, consistent brand overlays, and flexible masters make it possible to produce platform-ready variants rapidly.
Plan for templates. Create overlay and caption templates for each platform: vertical safe-margin presets for TikTok, short lower-thirds for Instagram, and expanded captions for YouTube. Once templates exist, applying them is a few clicks.
Batch processing. Use batch export where available: queue 9:16, 1:1, and 16:9 renders with respective burned-in captions and sidecar outputs. Automating LUTs, intro/outro stingers, and watermark placement saves repeated keyframing.
Sample 30-minute timeline for a 45s master
- 0–5 min: Import master, generate transcript, and run a quick edit pass.
- 5–12 min: Fix captions and style them; choose burned-in & export SRT.
- 12–18 min: Add voiceover and music; set ducking and quick fades.
- 18–24 min: Apply brand overlay templates for vertical and square versions.
- 24–28 min: Run loudness normalization and export presets.
- 28–30 min: Quick QA on one device and queue uploads.
When you use a single post-production tool to do all of that, you avoid time lost moving between apps and reconciling mismatched timing. If you produced your footage with an AI generator, consider pairing that tool with a finishing tool so you don’t rebuild the mix in a separate app — for video generation, see GoCrazyAI’s AI video generator. For music beds, use the AI music generator to create copyright-free instrumentals that drop straight into your mix.
Why GoCrazyAI Media Mixer is the final step — a one-click path from AI clip to publish-ready asset
GoCrazyAI Media Mixer is built to be the single finishing panel after you generate footage. It combines the exact capabilities creators need: voiceover and music layering, automatic subtitle generation and burning, overlay controls, and one-click export of a ready-to-publish file.
Centralized post-production. Instead of stitching together multiple apps for captions, audio, and export, the Media Mixer keeps all post-production in one tool. That reduces file transfers, sync mistakes, and time spent reconciling track versions.
Concrete proof points. The Media Mixer:
- Adds voiceovers and music to AI videos from one panel.
- Generates and burns subtitles automatically while exporting sidecar files.
- Layers text and overlays and previews them across aspect-ratio variants.
- Exports a single publish-ready file or queues multiple aspect ratios in one operation.
Worked example — finish a Veo clip in under 20 minutes
- Import your Veo master into GoCrazyAI Media Mixer.
- Generate subtitles and run the Quick Review to correct 85–95% automated errors.
- Use AI Voices or upload a voiceover; place it on the Narration track and enable Auto-Duck.
- Import a music stem from the AI music generator, set ducking, and trim to the cut.
- Apply a brand overlay template, preview 9:16 and 1:1, then choose Burned-in + SRT exports.
- Click Export — the Media Mixer renders both burned and sidecar files and delivers platform-specific MP4s.
Because all steps live in one interface, you keep context and spend time on creative decisions instead of file management. If you earlier generated imagery for thumbnails or title cards, you can import those from the AI image generator and drop them into overlays without leaving the workspace.
When your goal is publish-ready AI clips that respect accessibility and platform specs, finish in the tool designed to finalize AI footage. Open the AI video editor and ship your first polished clip in your next break.
Conclusion
Polishing AI-generated footage is mostly about systems: a verified transcript, clean audio, legible captions, and template-driven exports. GoCrazyAI Media Mixer ties those systems together so you can add voiceovers, music, SFX, subtitles, and overlays without hopping between apps. Use the Media Mixer to burn captions, export SRT/VTT, batch aspect-ratio renders, and normalize loudness in one pass — then publish confidently.
Sources
- Subtitle Statistics (Kapwing)kapwing.com ↗
- The Professional's Guide to Video Captions in an AI-Enabled Workflow (Nemo Video)nemovideo.com ↗
- AI Video Editing: Complete Guide (FluxNote)fluxnote.io ↗
- AI Video Editors 2026 – Cut, Captions, B-roll, Repurpose Shorts (AI Tools Business)aitoolsbusiness.com ↗
- Complete AI Video Production Workflow Guide 2024 (FindAIVideo)findaivideo.com ↗
- AI Subtitle Accuracy: Real-World Accuracy Test (AI Video Summary)aivideosummary.com ↗
- AI Video Editing Tools That Save Hours of Work (GenAI Last)genailast.com ↗