Turn One Still Into High-CTR Promo Clips: A Practical Guide to AI Thumbnail Animation
Convert one product photo into short animated teasers that boost CTR. Hands-on workflows, A/B testing, and scaling with GoCrazyAI AI Video Generator.
Picture a crowded feed: thumbnails flash by, your product photo sits still while everything around it breathes and moves. That motion is the tap trigger. AI thumbnail animation is the practice of taking a single still and turning it into a short, loopable motion teaser that boosts curiosity and clicks. In this guide I’ll show why animated thumbnails and image-to-motion teasers outperform static images, how to pick the right motion style for the platform, and a hands-on walkthrough that converts one product shot into a 6–10 second promo you can export in multiple aspect ratios.
Throughout the article I’ll use the GoCrazyAI AI Video Generator as the practical tool to build and scale these teasers. The generator routes to Kling 2.5 Turbo Pro, Veo 3.1, and Sora 2, supports direct image-to-video animation, and exports 9:16, 1:1, and 16:9 outputs without manual keyframing — which is exactly what creators, marketers, and small teams need when speed matters. Expect explicit steps, a worked example, A/B testing recommendations, and a repeatable template for batch runs. If your goal is more clicks from existing assets, this workflow will get you there in minutes rather than hours.
Why animated thumbnails and image-to-motion teasers outperform static images (data-backed)
Animated thumbnails work because motion signals promise. In crowded discovery surfaces — Shorts, Reels, TikTok, and YouTube feeds — anything that looks like movement interrupts scrolling and increases curiosity. Platform guidance and creator playbooks consistently list thumbnails as a primary driver of CTR; many top-performing channels use custom thumbnails, and industry guides report roughly 90% of best-performing videos using custom thumbnails rather than auto-selected frames. Improving thumbnails is one of the highest-leverage ways to lift CTR inside that common 2–10% range many channels sit in.
The practical implication: a custom animated variant lets you test not just composition but also motion and pacing. Short, loopable motion conveys additional narrative (a product rotating a degree, a subtle scale shift, or a reveal) without changing the underlying asset set. Creator reports and tool reviews in 2025–2026 show image-to-video engines (notably Kling 2.5 Turbo Pro, Veo 3.1, and Sora-family models) now support direct image-to-motion generation and multi-prompting for scene control. That eliminates manual keyframing for many thumbnail use-cases and lets teams produce multiple variants in minutes.
Motion acts like a visual headline: it promises action without asking for audio.
Because autoplay on many platforms is silent, animated thumbnails must carry their message visually — strong contrast, readable subject, and rhythmic motion. When you combine a custom static thumbnail with a fast looped animated version you can A/B test creative forms of curiosity: static, micro-motion, or reveal. The result is measurable: higher CTRs and, when paired with strong first 15s retention, a durable lift in distribution.
Choosing the right motion style for your thumbnail: subtle parallax vs dramatic reveal
Not all motion is equal. The right motion style depends on the asset, platform, and objective. Here are four motion types that consistently work for thumbnails and short promos:
- Micro-parallax (3–5° camera shift): A tiny camera pan or depth move that separates foreground and background elements. It’s perfect when you need to preserve composition but add life — especially for product close-ups and hero faces.
- Dynamic crop + reveal (3–7s): Start tight on a product detail and slowly reveal the full product or scene. This is high-curiosity, good for YouTube Shorts and TikTok where viewers expect a mini-story.
- Stop-motion / duplicated elements (3–8s): Subtle repeated element movement — floating cards, duplicated product shots flipping in sequence — works well for social ads because it reads even in small previews.
- Story-mode openers (8–12s): Build a micro-narrative using staged motion and cuts; best for short-form video intros where you want more context before the first cut.
Each type trades off attention and time. Micro-parallax wins on clarity and legibility in small thumbnails — it won’t obscure product details and fits 3–5 second loops easily. Dynamic reveals increase curiosity but demand slightly longer runtime and careful pacing so the reveal lands within the first 3–7 seconds. Story-mode openers perform best when you have a clear hook and are willing to allocate 8–12 seconds of attention.
Model-level capabilities matter here: modern image-to-video models like Kling, Veo, and Sora accept multi-prompt inputs for camera motion, depth masks, and timing cues — enabling precise micro-parallax or cinematic reveals from the same starting image. The recommendation is to start conservative: test micro-parallax and a dynamic reveal for a product shot, then scale the winning motion across aspect ratios.
Hands-on: Create a 6–10 second promo teaser from a single product photo (step-by-step workflow)
This walkthrough converts a single product photo into a 6–10s promo using the GoCrazyAI AI Video Generator. It uses the image-to-video capability, multi-prompt scene control, and direct export to 9:16/1:1/16:9.
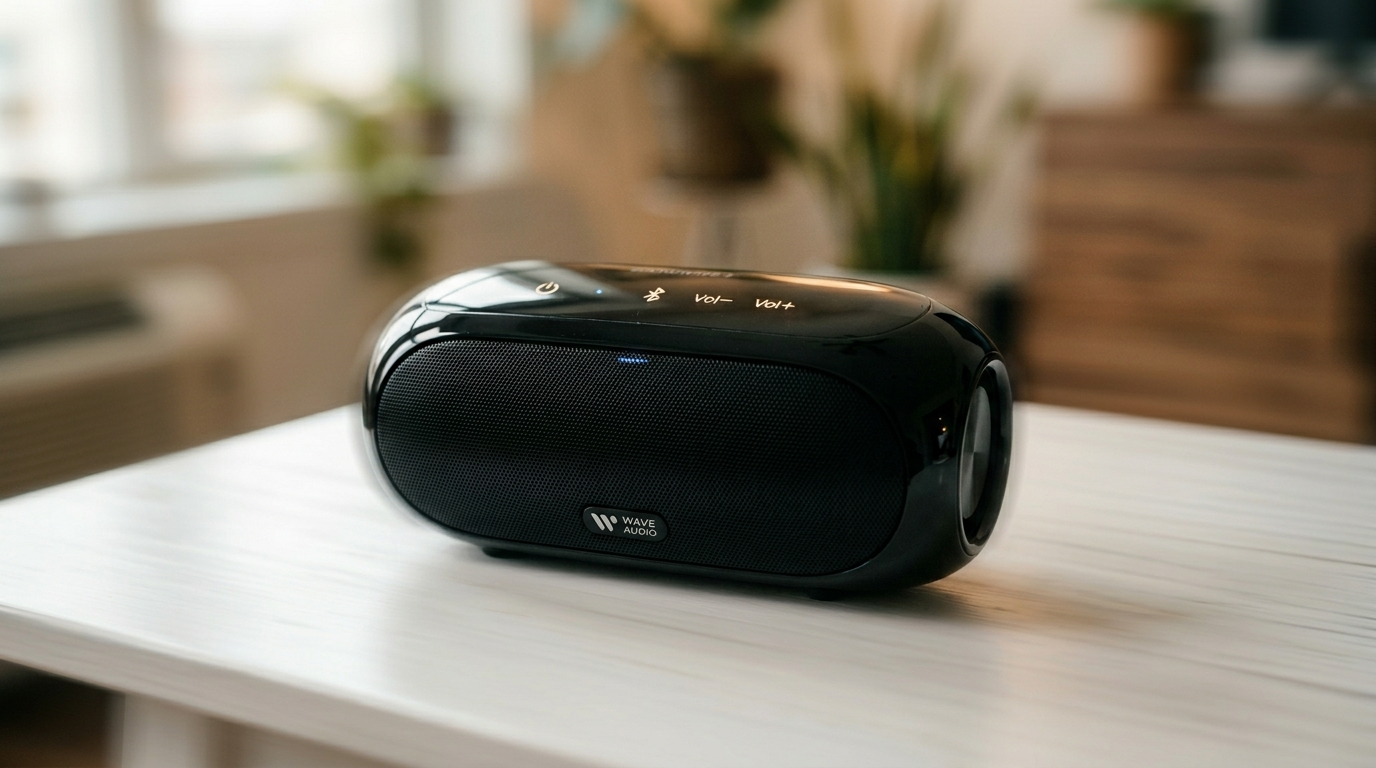
Worked example: You have a clean hero photo of a wireless speaker on white background. Goal: a 6s loop for TikTok and a 1:1 version for Instagram.
Step 1 — Prep the image: Crop a 16:9 and 9:16 reference from your hero photo using any image tool. Optionally run the hero through the GoCrazyAI Image Upscaler or relight if you need cleaner highlights (/Image-upscaler or /relight-image). This improves model fidelity.
Step 2 — Open the GoCrazyAI AI Video Generator at /create-ai-video and choose Image-to-Video > Upload Reference Image. Select Kling 2.5 Turbo Pro for crisp camera motion or Veo 3.1 for slightly longer cinematic movement.
Step 3 — Enter multi-prompt controls:
- Prompt A (foreground): "tight product focus, sharp detail, subtle rotation + 3° left camera pan over 4s"
- Prompt B (background): "soft vignette, slow parallax 1–2° opposite direction"
- Timing cue: "6s loop, smooth ease-in/out, no audio required".
Step 4 — Configure outputs: request 9:16 (1080x1920) and 1:1 (1080x1080). The AI Video Generator will route to the selected model and render both aspect ratios from the same prompt in one job using the platform's multi-output feature.
Step 5 — Review and iterate: preview the clip. If the motion feels too strong, reduce the camera pan to 2° and re-render; if you want more drama, add a dynamic crop move that reveals a product label at 4s.
Practical notes: use silent visual rhythm (pulsed scale, micro-shake) rather than relying on audio. Export with loop-friendly in/out frames so the platform’s autoplay looks seamless. This end-to-end job typically takes minutes on GoCrazyAI rather than hours of manual keyframing, letting you iterate quickly across variants.

Hands-on: Rapid A/B testing and export workflow for platforms (YouTube, TikTok, Reels)
Testing is how you turn creative wins into repeatable lifts. The A/B approach pairs a static thumbnail against one or more animated variants, with clear success metrics: CTR and first 15s retention. Here’s a rapid workflow you can use across platforms.
1) Create three variants from the same image: static, micro-parallax, dynamic reveal. Use the GoCrazyAI AI Video Generator to render each animated variant in the three target aspect ratios. Export both loop-capable MP4s and a representative frame as a static thumbnail.
2) Platform setup: for feeds (TikTok, Reels) run the animated variants as the primary clip in separate ad/boost experiments or use pinned posts. For YouTube, upload the same video but test static vs animated thumbnails in sequential uploads or through paid experiments where available. Industry guidance suggests monitoring CTR and watch-time signals together; use CTR for the thumbnail test and pair it with first 15s retention to ensure the video itself meets expectations. See a concise best-practices guide for thumbnails here: YouTube Thumbnail Best Practices for Higher CTR.
3) Rapid analytics loop: run each variant for a few hundred impressions to collect meaningful CTR data (platforms vary, but small tests can indicate direction). If the animated variant increases CTR, push the winning motion across other titles. If CTR rises but retention drops, iterate the opening 3 seconds of the video with a stronger hook.
4) Export checklist: deliver 9:16 for TikTok/Reels, 1:1 for Instagram, and 16:9 for YouTube. The GoCrazyAI generator produces multiple framing outputs from the same prompt so you can export all three in one job, saving time and keeping motion consistent across sizes.
A/B testing tips: vary one variable at a time (motion type or crop) and keep copy and upload timing constant. Test emotional face vs product close-up as a second axis — sometimes a cropped, emotional face with micro-parallax beats a product shot in CTR, depending on your audience.
Scaling a thumbnail animation system: templates, batch runs, and brand consistency with GoCrazyAI
Once a motion style wins, scale it. The goal is a system that produces consistent thumbnails across dozens or hundreds of SKUs without manual rework. Here’s a practical scaling plan that leverages GoCrazyAI’s features and integrates other GoCrazyAI tools where useful.
1) Build motion templates: codify the motion parameters that performed best (e.g., 3° left pan, 0.04 scale pulse every 2s, vignette strength). In GoCrazyAI AI Video Generator you can save these as templates or re-use the multi-prompt presets so every new image inherits the same camera motion, timing, and loop flags.
2) Batch runs and credits: prepare a CSV of images and titles, then run them in batches. GoCrazyAI routes jobs to Kling, Veo, or Sora from a single credit pool, which avoids juggling model subscriptions; this makes batch rendering cost-effective. Monitor credits via /credits and size your plan for expected render volume.
3) Brand consistency: enforce color, type, and logo placement by pre-processing images with the AI Image Generator and Image Upscaler. For example, relight images to match brand tones (/relight-image) or generate on-brand graphic overlays in the AI Image Generator and composite them in the generator job.
4) Post-production and localization: after rendering, use GoCrazyAI Media Mixer (/ai-video-edit) to add subtitles, voiceovers, or music variations. If you need localized thumbnails with translated text, the AI Dubbing and AI Voices toolset can produce localized audio previews while the visual remains unchanged.
5) Quality control: spot-check random outputs for motion clipping, subject cut-off, or brand violation. Because the generator supports multi-output, you can ensure the same motion reads across 9:16, 1:1, and 16:9 without separate creative passes.
With these building blocks you can convert one-day creative sprints into an ongoing pipeline that populates feeds, ads, and landing pages with high-performing animated thumbnails. Teams report cutting asset turnaround from hours to minutes using image-to-video workflows — the efficiency gains compound once templates and batch runs are in place.
Conclusion
Animated thumbnails and image-to-motion teasers let you squeeze more performance from existing photography. Start with conservative motion (micro-parallax + loop), test against a static control, and scale winning templates through batch runs. For a fast, repeatable pipeline use the GoCrazyAI AI Video Generator — it animates a single still into short-form video, routes to Kling, Veo, or Sora as needed, and exports multiple aspect ratios in one job. Try a practical experiment: pick your top-performing product photo, open the AI video generator, upload the image, apply a 3° parallax template and export 9:16 and 1:1 variants; measure CTR and iterate. When you need image polishing, combine this with the AI Image Generator for relighting or the pricing and credits page at GoCrazyAI Pricing to size your renders. Open the AI Video Generator, drop in your prompt or a reference image, and ship a clip in your next break.
Sources
- YouTube Thumbnail Best Practices for Higher CTR (2025) - Instantviewsinstantviews.net ↗
- YouTube Thumbnail Guide 2026: 8 Rules to Double Your Click-Through Rate - NEXORA Blognexora-ai.org ↗
- I tried Kling's new 2.5 Turbo AI video generator — Tom's Guide reviewtomsguide.com ↗
- Veo 3.1 coverage and features - TechRadartechradar.com ↗
- Image-to-video / model product pages (example: PXZ.ai / imageat showing image-to-video workflows)pxz.ai ↗
- YouTube Thumbnail Design: What Actually Gets Clicks (data-driven guide) - Kapa99kapa99.com ↗