AI voiceover mixing: Practical guide to narration with music
Step-by-step guide to mixing AI voiceovers with music: levels, ducking, timestamps, and how GoCrazyAI AI Voices speeds production and exports stems.
<!-- KEYTAKEAWAYS -->- Aim voice peaks near -6 dBFS and lower background music by ~10–14 dB during speech for optimal intelligibility.- Use gentle compression (2:1–4:1) and 3–6 dB peak reduction to keep AI voice dynamics even without sounding squashed.- Speech-aware ducking driven by word-level timestamps or VAD gives the cleanest, most musical results.- High-pass voice around 80–120 Hz and carve 2–4 dB around 200–400 Hz in music to reduce masking and mud.- Export separate stems and millisecond-accurate timestamps from your TTS to speed iterative balancing and platform mastering.<!-- /KEYTAKEAWAYS --> If you publish narrated videos or podcasts, AI voiceover mixing is the single skill that improves clarity, retention, and watch time. This guide gives creators the practical mixing rules and a repeatable workflow to mix narration with music and SFX without losing emotion or intelligibility. Start by choosing the right voice — try GoCrazyAI AI Voices with its 160+ premium voices and cloning options to find a narration tone that minimizes corrective EQ and processing. See the AI voice cloning and voice library at AI voice cloning.
Read on for level targets, compression and EQ settings that work every time, a step-by-step method to generate and export word-level timestamps, and a short hands-on walkthrough showing how to use GoCrazyAI AI Voices to export a dry stem and word timestamps for perfect sync.
Why clean voice-first audio matters: research and measurable effects on retention
Creators often treat audio as an afterthought, but audio clarity directly affects engagement and retention. Veritonic’s audio attention research links poor audio quality to lower attention and a higher likelihood of abandonment — viewers notice muddy or masked speech before they notice slightly soft visuals. Clean, voice-forward mixes increase comprehension and reduce rewatch friction, which matters for YouTube algorithm signals that reward watch time and retention[[1]](https://20817577.fs1.hubspotusercontent-na1.net/hubfs/20817577/Veritonic%20Audio%20Attention%20Report%20Final.pdf).
Practically, that means you should prioritize intelligibility over loud music or dense production choices that compete with the midrange where speech lives. For podcasting, faceless TikTok channels, or narrated explainer videos the goal is single-minded: make the words easy to hear without deadening the music’s emotional role. Measurable targets support this — aim for voice peaks near -6 dBFS and background music roughly 10–14 dB lower during speech so the listener receives an unobstructed vocal signal while the music still reads as present and impactful.
Those level targets give you a repeatable baseline you can A/B test across platforms and content types. When creators apply them consistently, retention climbs because listeners spend less time straining to understand and more time processing the message.
Core mixing principles for narration + music (levels, compression, EQ, and masking)
Start with levels. Set your narration bus so peaks hit around -6 dBFS. Bring your music up until it sounds musical behind the voice, then reduce it 10–14 dB during speech regions — this preserves the emotional weight of the track while keeping clarity. Those numbers are a practical rule of thumb most creators use for fast, reliable results.
Compression comes next. Use gentle dynamic control: a 2:1–4:1 ratio and program-dependent attack and release so consonants keep their clarity. Target 3–6 dB of gain reduction on peaks to smooth the AI voice’s natural variance without making it sound overly processed. Compression reduces the chance a softer AI syllable gets masked by the music, especially useful when using expressive AI voices that vary intensity.
EQ and masking: high-pass the voice bus at 80–120 Hz to remove rumble and create headroom. On the music bus, carve a 2–4 dB dip between 200–400 Hz to reduce “mud” that competes with the vocal midrange. Use a narrow Q for surgical dips and a broader Q for tonal shaping. If the music has a dominant midrange instrument, automate a broader cut only during vocal passages.
Masking is often resolved with automation and surgical EQ rather than brute-force loudness changes. Use dynamic EQ when a singer or instrument intrudes into the vocal range only on certain phrases — dynamic tools respond when needed without making the whole track sound dead.
Workflow — generate, time-align, and export word-level AI voice timestamps for perfect sync
A reliable workflow saves hours. The fastest pattern: (1) generate the narration, (2) extract word-level timestamps, (3) place the voice in your timeline, then (4) align music and scenes to the spoken phrasing.
Generate the voice first. Producing the narration before you edit the video lets you pace the cut around the vocal cadence. Modern TTS and AI voice systems can provide word-level timestamps or VAD data; when available, these timestamps let you align video cuts to breath marks and consonant attacks with millisecond accuracy. Because word-level timestamps are accurate to the millisecond, you can trim or nudge visuals so the action and the voice land together, which improves perceived production quality and pacing[[2]](https://iron-mind.ai/blog/sync-ai-voiceover-music-video-timestamps).
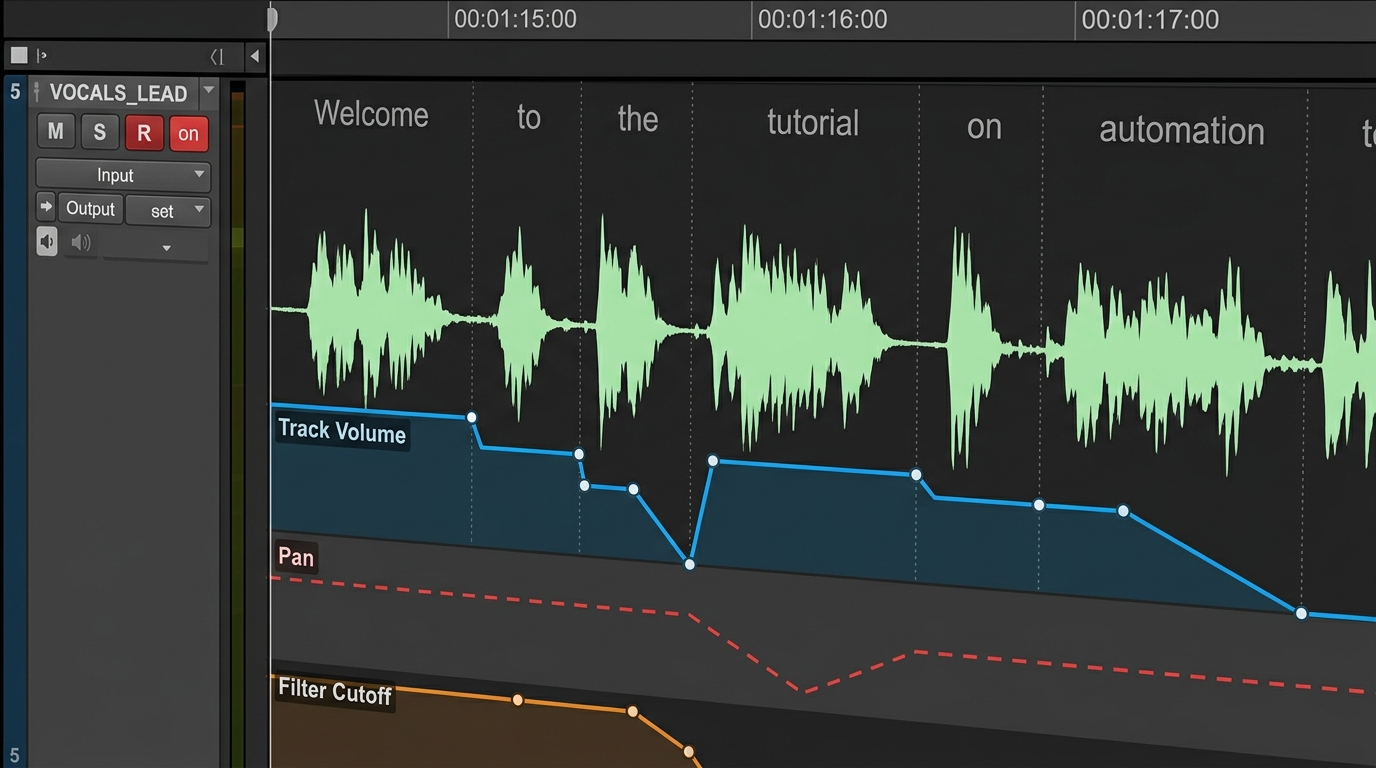
Once the voice is in the timeline, use the timestamps to create speech regions. From those regions you can generate automatic music keyframes or ducking envelopes: keyframes that lower the music only when voice activity is present produce smoother, more musical fades than simple sidechain compression. Export stems at this stage — separate voice, music, and SFX — so you can iterate on the music balance without re-rendering the voice. Delivering a dry voice stem plus a mastered mix makes platform-specific loudness adjustments trivial and speeds publishing cycles.
Hands-on: automatic ducking, stem balancing, and building a reusable mix preset
Automated ducking driven by speech boundaries is the quickest way to keep music musical while preserving intelligibility. Many DAWs and editors will create volume automation from VAD or timestamps; the automation typically inserts volume keyframes at each detected speech boundary and applies short fades to prevent clicks. The result sounds natural and keeps the music’s rhythm intact.
Stem balancing workflow (repeatable): export three stems — dry voice, music, and SFX. Start the mix with the voice stem at -6 dBFS peaks. Import the music stem and set a static music level that sounds musical in gaps. Then apply speech-aware ducking tied to your voice stem so music drops 10–14 dB only when the voice is present. Keep SFX on a separate bus and treat them like musical accents; pull them back more aggressively during dense speech passages.
Create a reusable mix preset: save a voice bus chain with an HPF at 80–120 Hz, a gentle compressor (2.5:1 ratio, medium attack, medium release), and a short de-esser. Save a music bus chain with a midrange dip at 200–400 Hz (2–4 dB) and a sidechain or automation template that reads word-level timestamps. Apply a single fader automation template to any project and you’ll have consistent results across episodes. This preset approach lets you focus on creative choices instead of technical setup on every project.
Creative polishing: using voice design (formant, timbre) and ambience to blend AI voices with music
Once levels are solved, design decisions determine whether the voice lives in front of the music or is embedded within it. Use light formant shifting to nudge timbre without changing timing, and add subtle reverb or room ambience to glue the voice to the same acoustic space as the music. If the music is dry and intimate, keep reverb short and low; if it’s big and cinematic, a longer plate with pre-delay can make the voice sit in the mix without losing definition.
Be cautious with pitch and formant changes: wide formant shifts can make speech unnatural and harder to process. Small, tasteful changes let you match voice color to your musical palette — for example, a darker timbre for cinematic underscores, or a brighter presence for high-energy explainer tracks. When you clone a voice or pick from a large library, choose a voice whose base timbre needs minimal corrective EQ; that reduces processing artifacts and preserves intelligibility.
Ambience automation helps too: automate a small increase in room tone or reverb tail during music swells and reduce it during close, conversational phrases so the listener perceives intimacy where it matters. These small creative moves preserve clarity while giving the final mix emotional weight.
Why GoCrazyAI AI Voices is the right tool: 160+ voices, cloning, and export options that fit the mixing workflow
GoCrazyAI AI Voices is built for creators who need control and speed. The library includes 160+ premium AI voices so you can pick a voice whose natural tone reduces the amount of corrective processing required. That alone speeds mixing: a well-matched voice needs less EQ, less compression, and fewer pitch/formant adjustments.
Two features make GoCrazyAI AI Voices particularly useful for the workflows above. First, voice cloning from a short, clean sample lets you create a personalized narration voice without recording every line — ideal for creators who publish high-volume content or want a consistent brand voice across formats. Second, GoCrazyAI can generate narration from text across those 160+ voices and export usable assets: dry voice stems and word-level timestamps. Those exports slot directly into your DAW or editor so you can apply the stem-balancing and speech-aware ducking techniques described earlier.
Worked example — a short walkthrough using GoCrazyAI AI Voices:
1) Choose a voice in GoCrazyAI AI Voices that matches your project (e.g., warm midrange for storytelling). 2) Paste your script and request narration; enable the option to include word-level timestamps and a dry voice stem on export. 3) Download the dry voice stem and the timestamps JSON/CUE file. 4) Import the stem into your DAW and set the voice bus to peak at -6 dBFS; import timestamps to create speech regions or automatic ducking envelopes. 5) Import your music stem (or generate a score with GoCrazyAI AI Song Generator if you need a custom track) and apply the 10–14 dB ducking during speech using the timestamp-driven automation.
This flow reduces back-and-forth between voice generation and mixing and gives you millisecond-accurate sync for pacing edits. Because GoCrazyAI exports stems and timestamps, you keep full control over final loudness and platform mastering, and you avoid destructive processing on the generated voice.
Frequently Asked Questions
What level should my voice and music sit at for narrated videos?
Aim for voice peaks around -6 dBFS and lower background music by about 10–14 dB during speech to preserve intelligibility while keeping musical impact.
Is word-level timestamping necessary for good sync?
Word-level timestamps aren't mandatory but they make millisecond-accurate alignment possible, improving perceived pacing and enabling smooth speech-aware ducking.
Will AI voices need a lot of EQ and compression?
Good AI voice choices reduce corrective work; use gentle compression (2:1–4:1) and a high-pass filter at 80–120 Hz, and apply narrow mid dips in the music rather than heavy vocal EQ.
Can I export separate stems from GoCrazyAI?
Yes — exporting dry voice stems and timestamps is part of a recommended workflow so you can iterate on balance and platform-specific mastering.
Conclusion
Mixing AI voiceovers with music is a repeatable craft: use consistent level targets (-6 dBFS voice peaks, music 10–14 dB lower during speech), gentle compression, surgical EQ, and speech-aware ducking driven by word-level timestamps. Choosing the right source voice shortens the list of corrective steps — GoCrazyAI AI Voices’ 160+ voices and cloning features make it fast to find or create a voice that requires minimal post-processing. For a practical speed boost: generate your narration in GoCrazyAI AI Voices, export the dry stem and word timestamps, then import them into your editor to apply timestamp-driven ducking and stem balancing. Open the AI Voices and clone your voice to streamline every future mix.
Sources
- AI Voice Library – Browse & Create AI Voices | GoCrazyAIgocrazyai.com ↗
- Auto-Mix Voiceover With Background Music: Get the Levels Right Every Time | VidNovidno.ai ↗
- How to Sync AI Voiceover, Music, and Video Using Word-Level Timestamps — Iron Mindiron-mind.ai ↗
- How to Mix AI Voiceovers with Music and Sound Effects | Kukarellakukarella.com ↗
- Behind the Mic: 2024 Audio Trends for Voice Actors (Voices.com PDF)static.voices.com ↗
- Veritonic — Audio Attention / Audio Quality findings (Audio Attention Report)20817577.fs1.hubspotusercontent-na1.net ↗
- How do you blend AI vocals and instruments in the same track? (Sonarworks blog)sonarworks.com ↗
- MixAssist: An Audio-Language Dataset for Co-Creative AI Assistance in Music Mixing (conference / arXiv)arxiv.org ↗